How to speed up WordPress Apache using Batcache Multisite and Memcache on CentOS

I run a small WordPress network on an Amazon Micro Instance and this means that I need to stay on top of caching. Having had a look around at a lot of different options I decided that I would use Batcache and Memcache to provide me with in memory caching should one of my posts get popular. Batcache multisite capabilities means that I don't have to stress about individual caching setups per site. Also Batcache is what WordPress.com uses to handle caching and you can utilise Memcache in a distributed way should you need to scale out from a single server.
Another reason I like it is that it is very non-invasive caching technique, I know that WP-Super-Cache and the way that it generates static files is probably a better fit for my blog as the load isn't usually very concurrent. However that sounded quite straight forward and I like a command line challenge plus I have a few side projects that this might come in handy for. You also need to get this setup if you are ever deploying anything to WordPress.com which we utilise for our hosting at Metro.co.uk.
As I am running a network, I don't want other users to have to worry about caching and its quirks. The nice thing about Batcache is that it doesn't cache anything when you have cookies from the domain so anyone who is writing can see their changes immediately. I think this and its simplicity is probably the key advantage over some other methods of caching.
The other thing is that if you have root access to your server then it is reasonably straight forward and I thought that I would share how I did this here in case anyone else is interested.
First install all of the libraries that you need to run memcache and access it via PHP, it took me a few times to get this right so there might be a few libraries which are extra below.
sudo yum install memcached
sudo yum install php-pecl-memcache
sudo yum install zlib-devel
sudo yum install php-pear
sudo yum install php-devel
sudo yum install libmemcached-devel
This is the compiler I used for building
sudo yum install gcc
This will build the libraries that PHP needs to be able to access Memcache
sudo pecl install memcached
Now make sure that memcached will start on startup
sudo chkconfig memcached on
I also enabled memcache session handling but haven't turned it on.
Enable memcache session handler support? [yes] : yes
I didn't do as it suggested below as every time I did I got errors saying that it had already been registered.
You should add "extension=memcached.so" to php.ini
I had a look at the config and tried to lock it down to localhost only but it kept on throwing errors when I did so I left it, as all of my ports are locked down via the Amazon Firewall this shouldn't be an issue.
sudo vim /etc/sysconfig/memcached
Now made sure that it would come back on startup.
sudo chkconfig memcached on
Now I followed these instructions for Batcache installation once I had downloaded it.
Upload advanced-cache.php to the /wp-content/ directory
Add this line the top of wp-config.php to activate Batcache:
define('WP_CACHE', true);
Tweak the options near the top of advanced-cache.php, I set mine to cache for 60 minutes after being hit twice in 10 minutes.
var $max_age =  3600; // Expire batcache items aged this many seconds (zero to disable batcache)
var $seconds =    600; // ...in this many seconds (zero to ignore this and use batcache immediately)
Optional Upload batcache.php to the /wp-content/plugins/ directory. As I ran Multisite I put this in the /wp-content/mu-plugins so it would be there for all of the sites in my network.
We have already installed the PECL memcached extension so you just need to add Ryan's Memcached backend 2.0 to wp-content.
Test by reloading a page in your browser several times and then viewing the source once you have cleared any cookies from the domain you are hitting. Just above the closing tag in the head you should see some Batcache stats.
generated 524 seconds ago
generated in 0.374 seconds
served from batcache in 0.002 seconds
expires in 3076 seconds
Now feel free to tweak the settings around cache time to a period where you will reduce the load. Remember this is full page caching and you shouldn't see it if you are logged in.
SEO Impact
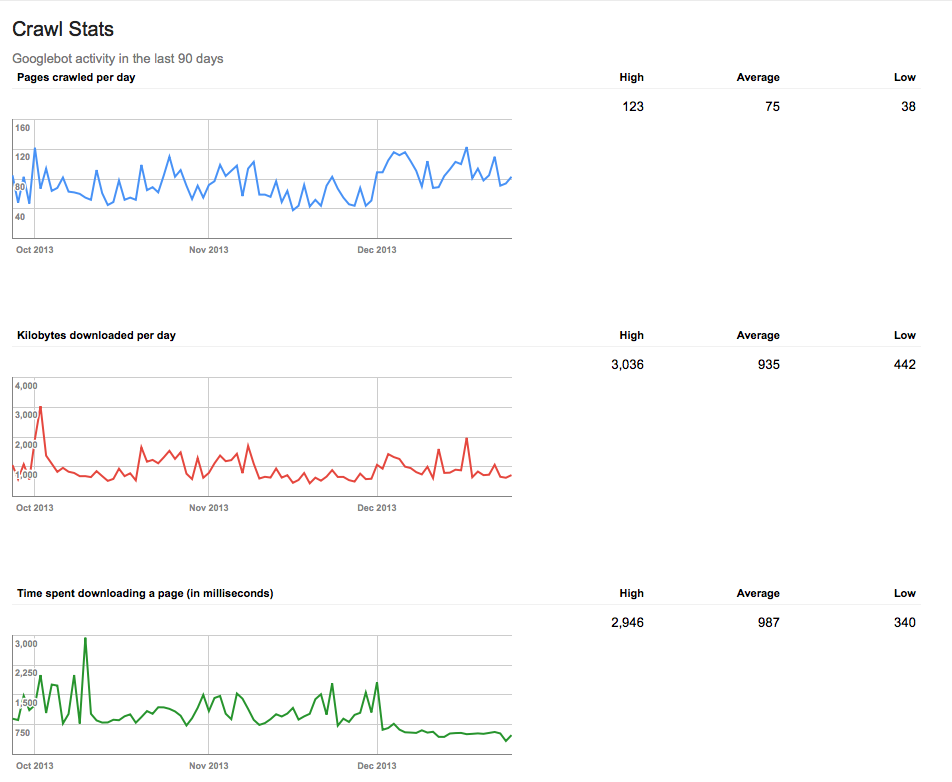
The best part of installing Batcache has been the impact on SEO, below are my crawl stats from Google and you can see that the average time spent downloading a page flatlines around the beginning of December after installing Batcache. The really interesting thing is that the pages crawled per day went up at the same time. I think this is because Google now thinks that that server can handle a much greater load so sends it its bots on a more regular basis. Can't say that this has had a massive impact on my SEO entries but it is a really good sign of the impact that you can have with a proper caching strategy.
Super fast and simple caching, if its good enough for WordPress.com its good enough for me. The below articles helped me along this journey.